Instructions - Flavor Injector
Grill Sergeant Flavor Injector
Instructions and FAQ
For those about to grill . . . we salute you.™
Thank you for your purchase! This flavor injector set, like all Grill Sergeant products, is designed to last a lifetime and some with our Lifetime Guarantee.
Cleaning and Storage Instructions
- Step 1: Clean - Before your first use, and after each subsequent use, clean your flavor injector in the same way. Unscrew the plunger from the tube body, and simply wash all components using standard dish soap and warm water. Rinse. You can also put all components in the dishwasher, and we recommend the top rack.
- Step 2: Dry - Let dry completely before storing.
- Step 3: Oil - Use your favorite food-safe oil (Canola, Peanut, Olive) to lightly lubricate the inside of the tube/plunger, reassemble by screwing the plunger onto the injector barrel, depress it completely, and store in the provided storage case.
Use Instructions
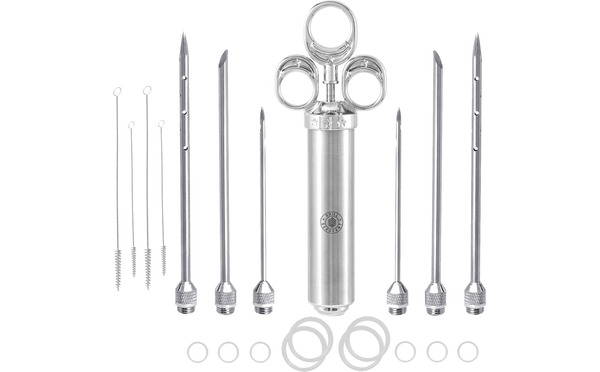
- Step 1: Select - Select the proper needle for your application and screw it onto the bottom of the injector barrel (ensuring that the o-ring is in place to ensure a tight seal)
- Step 2: Fill - Fill the barrel with liquid for injecting. There are 2 ways to fill your Flavor Injector prior to injecting.
- Method 1: Draw - Draw liquid into the barrel via a needle. Simply make sure the plunger is completely depressed, put the attached needle into the liquid so all holes are completely covered, and draw the liquid into the injector body by pulling up on the plunger.
- Method 2: Pour - Attach your preferred needle to the bottom of the injector. Unscrew the plunger from the top of the injector barrel and remove it. Pour your liquid into the barrel and then re-attach the plunger.
- Step 3: Inject - Insert the needle into your food and steadily apply pressure while withdrawing the needle slowly to spread the contents throughout your food.
Tips for Injecting
- Map out your injection points in advance so as to completely, thoroughly, and evenly apply your marinade/liquid flavor to the food
- Limit the number of injection (entry) points into the food to keep moisture in and limit the number of "holes" where moisture could escape
- Inject with the grain of meats, when possible
- Inject with a SLIGHT downward angle so gravity doesn't pull juices/marinades out of your food
Tips for O-ring Replacement
- Be sure to replace any o-rings that show signs of damage. We include 10 extra o-rings (including 4 extra large o-rings for the plunger) to last you a lifetime.
- The small o-rings on the needles should roll right off with slight pressure
- If an o-ring is bad, and you are having trouble removing it, simply (and carefully) use a sharp object to cut the o-ring. Cutting is a last resort and should only be used when necessary.
- To remove the o-ring from the plunger, simply place your fingers on either side of the attached o-ring, slightly push it away from you, while pulling/rolling up and it should come right off.
Always feel free to reach out to us for any reason - we love to hear from our customers and we are here for you!